Sign up TODAY for Card Making News! Learn More >
- Home
- Card Making Tutorials
- Gate Fold Cards
Gate Fold Cards
Are you tired of your landscape and portrait cards? If so, try creating a gate fold card.
They are great looking and simple to make. They can be used for any occasion - just use different sentiments and images!
Gate fold cards are named after their distinctive folding style. The card resembles the opening of a grand gate.
They consist of a rectangular piece of card stock. This is folded inwards from both sides, creating two flaps that meet at the centre.
These side flaps are then opened outward, revealing the message or design.
The beauty of gate fold cards lies in their versatility as there's nothing that says the opening can't be offset on one side.
Two scores on a basic card base will create your base.
Add layers of coordinating card or designer paper to each side. Finish with a shaped layer to "open" your "gate".
Getting Started...
To start, first collect your supplies...
- A sheet of US Letter or International A4 for your card base. Cut in half. This will create two card bases.
- Scoring board to measure and align card when making your folds
- Bone folder to create crisp creases
- Glue or double sided tape
- Extra card for layers and stamping.
- Stamps and ink
- Patterned paper - use instead of stamped images.
- Embellishments such as ribbon or sequins
Make sure you use heavier card for your card base to give the card more stability when "standing" up.
Step by Step
1. To fold and score your card base :
Lay your card base on the scoring board and mark the half way point,
Measure and mark the halfway point from the centre to both sides.
Score a straight line along the quarter point.
Repeat the process on the other side of the card, so you have two parallel score lines.
Fold the gate folds using your bone folder to create the two sides of the gate.
The edges of the gate folds should meet perfectly in the centre.

2. Decorate the Card Front:
Create layers for each side of your card front.
This can be stamped images or patterned paper.
Layer on matching coloured card to make your side panels pop.
Glue to the panels ensuring that there is equal weight each side.

3. Create a Centre Piece
The centre piece bridges the two panels. This hides the centre message and aids opening.
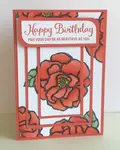
For this card and image and sentiment were stamped onto card. The card was cut with a die but a punch would also work.
Layer again onto additional card.
Stick on the left hand layer in the middle with glue or sticky pads.

4. Add a Card Insert
A card insert gives a more professional look.
Stamp with a sentiment and add small images or patterned paper for a special touch.
Add other embellishments if required.

Congratulations! You've successfully created your card.
Gate fold cards are a popular choice for a special occasion as they add a touch of elegance and surprise to your greeting card.
They are a good choice for weddings as you can add a beautiful satin ribbon to open the "gate".
Another option is make a belly band or a "sleeve" that slides over the card to close the "gate". A vellum belly band looks very professional and doesn't detract from your card front.
How to make a Belly Band
Measure the width of your card. This will help you determine how long and wide your belly band needs to be. Don't worry if you're not spot-on; a little extra room can always be trimmed down.
Cut a long strip of card that matches the width of your card.
Aim for a width of around 2-3 inches. This will be enough to hold your card together without overwhelming the card.
Use double sided tape to secure the ends of your belly band together to create a loop that fits snugly around your card. Make sure the band doesn't slip off easily but is loose enough to slide off.
More Gate Fold Cards
Now try the same idea by cutting your card the other way to create a card with offset "gates".
Here are the measurements for International A4 card...

1. Trim your A4 card to 11 1/2" along the long side (this makes the maths easier when dividing the sections!)
2. Cut it in half on the short side side at 4 1/8" to create two cards
3. With one card use a scoring board to score the long side at 3 1/2" and 9 1/4"
4. Fold card in at the score marks to create your basic gate fold card base.
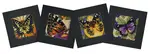
Here are some examples.....Why not try your own?

Here the smaller "gate" has been placed on the right side.
Patterned paper was used instead of stamped images.
The circles are cut from circle dies - a stitched circle die and a scalloped circle die. Circle punches could be used instead.
The heart image was stamped with clear Versamark ink and embossed with gold embossing power
Finally glitter dots were added for extra sparkle.

Discover More Card Making Tutorials....
Triple Time Stamping
Triple time stamping looks advanced and so elegant but it's actually quite simple. Why not have go?
Fabric Greeting Cards
It's quick and easy to make fabric greeting cards. Why not give it a go!
Easel cards
Easel cards make an instant impact and fold flat for easy posting.

- Home
- Card Making Tutorials
- Gate Fold Cards


FREE!
Card Making
Resources
in my

And
SIGN UP TODAY!
for more exclusive content