Sign up TODAY for Card Making News! Learn More >
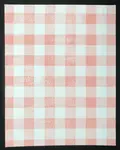
Paper Pads
for Card Making

Create stylish and amazing cards with paper pads for card making.
They're a versatile and fun way to add depth and interest to your card designs.
The paper is sold in packs or blocks of matching designs or themes.
They are available as...
- 6" x 6" pads
- 6" x 8" pads
- 8" x 8" pads
- 12" x 12" pads
For card making we mainly use the smaller pads leaving the larger 12" x 12" to scrapbookers as these have larger designs.
Most are double sided with coordinated colours and patterns. They might also include a mix of patterned and plain paper with labels to use as sentiments.
By allowing the paper do the work it's a quick and easy to put your cards together. You don't have to be an expert - so perfect for beginners!
Paper Pads for Card Making
The Benefits
One of the main advantages of using paper pads is the endless design options. There's so many patterns, colours, and textures available.
In fact, they're so appealing you don't want to use them! I'm definitely guilty of hoarding paper pads as the paper is too beautiful to chop up.
The answer of course is to buy two paper pads!
Whether you like floral prints, geometric designs, or whimsical motifs. There are paper pads for every taste and theme.
Paper pads will also save you time and effort when making cards.
Why spend hours colouring or stamping, when you can just cut and stick patterned paper to your card base. It instantly adds visual interest.
Paper pads are a cheaper alternative to stamps and dies.
The price of the pads is very reasonable for the number of cards you can make from one pad. It's always my first choice when batch card making.
Another advantage is that some brands such as Echo Park, Doodlebug and Stamperia sell ready made elements and die cuts to add to your card fronts.
Finally, the biggest plus is all you need are basic supplies.
Scissors, glue and card stock for card bases are all you need to start your card making. Yes, stamps, sentiment dies etc add more options but it's not essential.
So, try using paper pads to create visually stunning cards.
All without breaking the bank!
Paper Pad Ideas
Let's now take a look at some simple paper pad ideas using your paper pads......
Backgrounds

Paper pads are an excellent choice for backgrounds, especially when using a coordinated paper pad.
Use them to create a layered effect.
You can stick the paper directly to the card stock. Or, you can make a border by leaving a small edge of the card stock exposed.
This layered look adds depth and dimension to your card. It makes it more interesting.
Easy to create yet simply elegant!
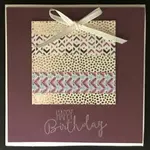
Add a cut out sentiment or label from your card pad. If you haven't any sentiment stamps write out your sentiment by hand.
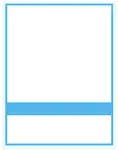
Strips

Add strips or blocks of patterned paper horizontally or vertically across your card. Vary from one simple strip to two or three for a more dramatic effect.
Either use the same patterned design or mix designs for a more unusual look.
If combining patterned paper use designs from the same pack so everything coordinates.
Another idea is to use strips of paper to make borders along the edge of your card to frame your card design.
One Sheet Wonders
This is when a sheet of from your paper pad is divided into multiple parts. One sheet will be divided up to make many cards.
If you search on Goggle or Pinterest "One Sheet Wonder" you will see lots of options on how to divide your paper.
These Daisy cards were created with a one sheet wonder using 12" x 12" sheet.
For ideas on making one sheet wonders of all sizes check out Jess Crafts Blog for templates on using your paper pads for card making.
Banners and Tags

Patterned paper makes great banners and tags. Either cut with scissors or use a banner or tag punch.
If combining different sized banners together you can mix and match your patterns. Use different sized patterns so they aren't competing with each other.
More Paper Pad Ideas....
- Paper Flowers - Use your patterned paper pad to create exquisite paper flowers that bring texture and depth to your cards.
- Cut Out Shapes - Trace various shapes onto the patterned paper and cut them out to adhere to your card. You can fashion shapes that are relevant to the theme or occasion the card is meant for.
- Pop-Up Elements - For an interactive touch, use patterned paper to craft pop-up elements inside your card.
- Torn Paper Collage - Rip pieces of patterned paper and layer them on your card for a rustic, homemade look.

- 3-Dimensional Embellishments - Use patterned paper to create 3D embellishments on your card such as butterflies, hearts, or stars.
- Origami Figures - If you're good at origami, use your patterned paper to create mini origami figures to decorate your card.
- Handmade Envelopes - Make a matching or contrasting envelope for your card using the same patterned paper for a coordinated set.
- Cards with Windows - Cut out a "window" in the front of your card and use a sheet of patterned paper as a backdrop, visible through the window.
- Patchwork Designs - Cut small squares or rectangles from your patterned paper and piece them together onto your card like a patchwork quilt.
- Paper Rosettes - Create decorative rosettes from the patterned paper and use them on your card.
Remember, there is no hard and fast rules. Use your imagination and get creative with your patterned paper pad projects!
How to Use Paper Pad Scraps

Keep all your left over bits from paper pads in a scrap box so they are ready to add to your cards.
Here are a few ideas....
- Add a small strip of patterned paper underneath a sentiment to make it stand out.
- Punch shapes to use as embellishments. For example flowers, balloons, stars, hearts.
- Create patchwork cards.
- Join scraps together to make a card front either horizontally or diagonally
- Make gift tags
- Decorate envelope flaps or bookmarks.
- Add strips to decorate the inside of your cards.
- Make confetti with small punches for shaker cards.
- Die cut numbers and letters
Tips for Using Paper Pads
- Coordinating Designs - Pick a theme and stick with it. Many paper pads come as collections, making it easier for you to match different patterns
- Choose Complementary Colours - When selecting patterned paper for your card-making project, make sure the colours complement each other. It's also important to ensure the colors match the theme of your card.
- Avoid Overcrowding - While patterns can add visual interest, using too many different patterns can clutter your card. Stick to using 2-3 patterns to stave off overwhelm.
- Balance Out Patterned Paper with Solids - If your card is too busy or visually confusing use some solid colours to break up the patterns. This will bring balance to the overall design.
- Consider Pattern Scale - The size of the pattern matters. Large patterns can make a bold statement but may not be suited to a small card. Small patterns work best for smaller cards and items like tags.
- Experiment with Layering: Layering different patterns can create an interesting visual effect. Start with a larger, bolder pattern as your base layer, and then add smaller patterns on top.
- Try Die-Cutting - Die-cutting patterned paper can be an effective technique for adding layers, shapes, sentiments and dimensions to your handmade cards.
- Create Envelopes - You can also use your patterned paper pads to make coordinating envelopes for your greeting cards.
- Customise with Stamping or Embossing - Add personal touches to your patterned paper pads with stamping or embossing. This adds a unique touch to your card.
- Paper Punches - Paper punches are a great way to incorporate small embellishments from your patterned paper into your designs. Flowers, stars, hearts, or even geometric shapes can make fun additions.
- Use Scraps Wisely - Don’t toss your scraps. Even small pieces of patterned paper pads can be used on a new card.
Remember, the key to using patterned paper pads effectively is to experiment and explore until you find combinations that feel right to you.
Creativity is subjective, what's important is that you're happy with the result.
Working with paper pads for card making is so satisfying as they enable you to produce amazing results for so little effort.
Feel free to experiment and mix and match different patterned paper. Create your own layouts, and most importantly, enjoy the card-making process.
The pads are easy to obtain and use, amazing for beginners providing a quick and uncomplicated way to make a handmade card.
If you haven't used patterned paper pads before do go out and buy a pack to try out some of these ideas.
I guarantee you'll fall in love with them!
See Also: Stretch Your Supplies
More Card Making for Beginners...
Using Focal Images
Using focal image will make your handmade cards stand out and can often convey more than words
Simple Card Making
If you are new to card making or just short of time try some simple card making ideas.
Matting and Layering for Card Making
What's matting and layering in card making? And how do you use them? Find out more....
Card Making Techniques for Beginners
Card making techniques for beginners to get you started with creating your handmade greeting cards
Card Making Sentiments
Add card making sentiments to your handmade cards to send a personalised message.
Card Making for Kids
Fun and easy card making for kids
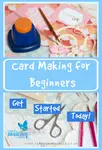
Card Making For Beginners
Interested in card making but not sure how to start? Join me and find out more with Card Making for Beginners.
Card Making Backgrounds
Create beautiful card making backgrounds for your handmade greeting cards
Simple Card Layouts
Use these simple card layouts for making cards with minimum supplies. Great for new card makers.
Easy Card Making
Time to get started! Easy card making ideas for beginners.
Card Sizes and Layers
Confused about card sizes and layers? Have a look at our short guide.....
How to make cards
How to Make a Cards - a Step by Step guide for new card makers.


FREE!
Card Making
Resources
in my

And
SIGN UP TODAY!
for more exclusive content