Sign up TODAY for Card Making News! Learn More >
- Home
- Card Making Ideas
- Stained Glass Cards
Stained Glass Cards
I've always had a fascination with stained glass in our churches and Cathedrals.
From centuries old craftsmanship to distinctive modern designs. I like them all!
It inspired me to have a go - creating a Celtic cross that now hangs in my garden.
But how do you achieve the beauty of the stained glass on handmade cards?
Quick and easy cards can be made with pre printed designs or stamped images on vellum.
By adding a few techniques you can create something completely different to make your stained glass cards uniquely yours.
Let's have a look at a few ideas.....
Before starting your cards check out your card sizes and layers.
With Sympathy and Best Wishes

Both these cards were made using the Graceful Glass designer vellum from Stampin Up! Each sheet is has a pre printed design ready for colouring.
Colour the sections from the front of the cards with alcohol markers (or whatever colouring medium you prefer).
Mount the vellum on white card to create a translucent effect. Use small amounts of Tombow multi liquid glue on the grey areas to avoid the glue showing through the "windows".
Layer both designs with black and yellow card to a black card base.
Glossy Accents were added to the square window and the yellow layer dry embossed with the Subtle embossing folder for added dimension.
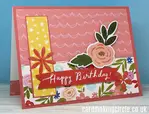
Happy Birthday

This card uses the Beautiful Day stamp set from Stampin Up!
Stamp the butterfly on vellum with Versamark embossing ink. Then heat emboss with gold embossing powder.
Colour on the reverse with alcohol markers so not to damage the embossing.
Mount the vellum on purple card to intensify the purple colour on the butterfly wings.
Small "photo" type hinges hold the vellum to the card layer.
Mount on a white card base and finish with a gold embossed "Happy Birthday".
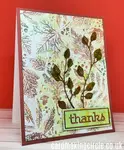
Thank You
The "Thank You" card was inspired by the SAS memorial window in Hereford Cathedral.

The wave like effect was created from the Seaside embossing folder (Stamping Up!).
Spread Versamark ink on the inside of the embossing folder on the raised side only. Add a vellum sheet and gently close. Hold for a few seconds.
Remove the card and heat emboss using silver embossing powder.
Once cool colour the reverse of the vellum.
Mount on white card and create a layer before sticking to your card base.
The alcohol markers produced a streaky effect. This was OK as glass used in stained glass often has textures and bubbles.
Complete the card with a die cut "Thank You". Die cut four times and glued pieces together.
Add Wink of Stella on top of the die cut for a shimmery effect.
Happy Birthday

To create the "glass": Blend autumn colours onto a layer of vellum with a blending tool or sponge. Stick to a layer of white card
Dry emboss the top layer of card (here in crumb cake card) and dry emboss with a Woodland embossing folder.
Die cut the embossed layer with the open leaf die (from the Seasonal Layers die set from Stampin Up!) three times.
Glue the vellum layer to the back of the embossed layer so the blended colours show through the leaf windows.
Die cut three detailed leaves in a darker card to fit into the die cut windows.
Mount onto a layer and card base (crumb cake).
Add a sentiment to complete card.
Life is a Beautiful Thing

Background: Use a brayer to create a gradient background of three complementary colours onto a card layer.
Die cut a detailed butterfly* four times and glue together. Stick onto white card.
Colour in between the intricate detail. Add Glossy Accents to make each section shine. Leave to dry.
When dry cut around the butterfly shape carefully with a craft knife on a cutting mat to remove base layer.
Add a final die cut of the butterfly in silver card.
Stick to background card.
Add sentiments and embellishments for the finishing touches.
*Springtime Impressions - Stampin Up!
Quilt Builder

The final card was created in the similar way to the previous card.
Use black card to die cut the shapes with a top die cut in gold card.
The dies were from a retired Stampin Up! set called Quilt Builder.
These are just a few ways to make stained glass cards. Try them out and see which method you prefer.
Look at your stamps and dies and see which ones you can use to create this wonderful decorative effect.
Discover More Card Making Ideas.....
Batch Card Making
Save time by using batch card making methods to create your cards
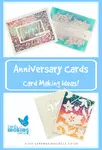
Wedding Anniversary Cards
Make unique wedding anniversary cards to recognise the years you have spent together.
Watercolour Card Ideas
Get creative with these fun and easy watercolour card Ideas!
Spring Greeting Cards
Brighten up your day with spring greeting cards in fresh and crisp colours.
Quick Birthday Card Ideas
Take a look at my quick Birthday card ideas to create cards when you are in a hurry.
Mixed Media Greeting Cards
Creating mixed media greeting cards is an opportunity to have fun and experiment with different mediums
Handmade Sympathy Cards
Create handmade sympathy cards to send love and support at a difficult time.
Handmade Easter Cards
Send you own handmade Easter cards to reconnect with friends and family this Easter.
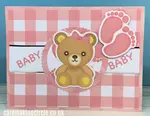
Handmade Baby Cards
Handmade Baby cards to express your joy for a new baby and their parents.
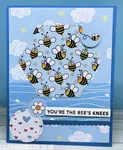
Handmade Bee Cards
A collection of handmade bee cards to spark your imagination.
- Home
- Card Making Ideas
- Stained Glass Cards


FREE!
Card Making
Resources
in my

And
SIGN UP TODAY!
for more exclusive content