Sign up TODAY for Card Making News! Learn More >
- Home
- Card Making Techniques
- Embossing Techniques - Step Two
Embossing Techniques
Step Two
Heat embossing is a knockout embossing technique that will magically transform your card making.
The result is electrifying!
So, what do you need?
- A craft heat tool
- Embossing powder
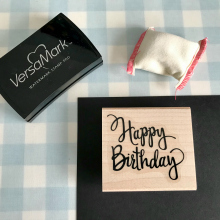
- Versamark - a clear sticky ink
- An embossing buddy - filled with anti static powder
- A stamp image or sentiment
Step by Step

2. Wipe card across with embossing buddy to remove static from card.
Stamp image or sentiment onto card with Versamark ink.
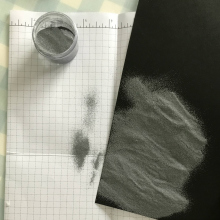
3. While ink is still wet sprinkle embossing powder over stamped image.
Work over scrap paper or a coffee filter to collect the excess powder.
Tap the card to remove any excess embossing powder. Use a small brush to remove tiny flecks of powder.
Pour excess powder back into the jar.
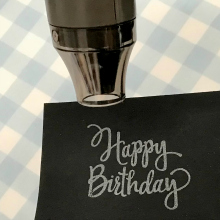
4. Hold card with tweezers. Move the heat tool across the embossed area evenly until it melts and changes colour.
A raised shiny image will appear.
5. Allow your embossed card to cool before making your greeting card.

Embossing powders are available in a range of colours. The most popular are silver, gold, white and copper.
You can also use coloured ink (pigment ink preferred) with clear embossing powder.
A dye based ink may be used but you will need to work speedily as it quickly absorbs into the paper. The image may also lose some of the finer details.
Other Heat Embossing Techniques
Emboss Resist
This works best with white embossing powder but any colour may be used.
Follow steps one to five above.
Once cool use a sponge or sponge brayer to cover your card with ink. The embossed image will resist the ink.
Wipe off with a tissue to remove any excess ink. Your image should stand out on the card.

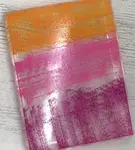
Sterigraph Technique
Create a background of complementary colours with a brayer onto white card. Start with the lightest colour and leave a few white spaces.
Once dry rub the card with an embossing buddy.
Stamp an image or sentiment with Versamark ink. Sprinkle with embossing powder and heat emboss with a heat gun.
Brayer over with the darkest colour. Use tissue to wipe ink from embossed images.
Stamp more images/sentiment onto the card with the darkest ink.
Split Negative Technique
This works best for a half black half white image.
Stamp image onto black card with Versamark and emboss with white embossing powder.
Stamp same image with black ink onto white card.
Cut the white card in half and glue to the black card carefully lining up the image.
Discover More Card Making Techniques....
Colouring for Card Making
Use colouring for card making on your handmade greeting cards.
Stencilling Techniques for Card Making
Create beautiful card backgrounds with stencilling techniques for card making.
Rub-Ons for Card Making
Save time by using rub-ons for card making for your handmade greeting cards.
Retiform technique
Learn how to do the Retiform Technique with step by step instructions.
Neurographic Art
Use neurographic art to create original handmade cards. It's so relaxing!
Napkin Cards
Save money by making cheap napkin cards from your left over paper napkins.
Card Making Techniques
Discover how to use different card making techniques to make your cards sparkle
Block Printing for Card Making
Have a go at block printing with your acrylic blocks to create easy watercolour backgrounds
Artist Trading Cards
Create Artist Trading Cards with your card making supplies to collect, trade or use on greeting cards.
Alcohol Ink Backgrounds
Add colour and texture to your cards with alcohol ink backgrounds.
- Home
- Card Making Techniques
- Embossing Techniques - Step Two


FREE!
Card Making
Resources
in my

And
SIGN UP TODAY!
for more exclusive content