Sign up TODAY for Card Making News! Learn More >
Matting and Layering
for Card Making
What's Matting and Layering?
Matting and layering is a bit of card making jargon that refers to backing card or paper.
Mats and layers add a frame or border to your card base or focal point. It draws your eye into the card and helps the focal point stand out or pop.
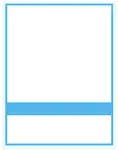
The most commonly used layer is either 1/4" if using imperial measurements or 0.5cm if using metric measurements.
You can have as many layers as you want. Depending on the colours chosen using multiple layers can look very effective.
As you become more experienced as a card maker experiment with different sized layers.
For example I find 1/8" layer with metallic card adds a special touch without overwhelming the card.

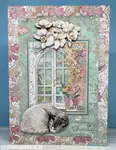
For the "Hope" card I used a layer of red card to completely cover the white card base. I used this to change the background colour of the card as the coloured card wasn't thick enough for the card base.
On top of this I layered pattered paper 1/8" smaller to create a thin red border.
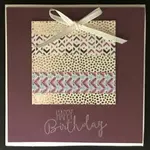
The sentiment was stamped onto a smaller piece of yellow pattered paper and matted onto matching yellow card 1/8" larger than the patterned paper.
The large border between the two layers makes the sentiment and butterfly stand out in the middle of the card.
Nesting dies are an easy way to add layers as the distance between each die is already worked out . This is especially useful for awkward shapes such as hexagons and ovals.

The mats for this card were created with the Spring Ovals die set from Whimsy Stamps.
How to use Mats and Layers?
Matting and layering helps separate the different elements of the card and create dimension by raising parts of the card.

With different patterned paper designs the layers help the eye differentiate between the patterns. This is useful when making cards from one 6 x 6" paper pad with co ordinated papers or following card making sketches.

The colour of your mat or layer is vital so try out different colours before making your final decision. A colour wheel will help you your colour choices.

For this easy Christmas card an embossed layer was mounted onto a contrasting mat before gluing to the card.
The sentiment was matted with the same coloured card to unify the overall card design.
How to Position your Mats and Layers?
When it comes to matting and layering the hardest part for many is making sure everything is even on all sides.
I must confess that I mainly "eyeball" it holding the paper over the layer or mat. To do this I use wet glue (such as Nuvo Deluxe adhesive or Tombow Mono adhesive) as you always have a bit of wriggle room before it sticks completely.
I occasionally use the measuring grid on my glass or cutting mat.
Create and Craft produce a Layer Perfect Tool that has received good reviews. It claims to helps you measure, align and position a variety of different shapes to create perfect layers. I personally haven't tried it but if you have or if you have any other suggestions let me know in the comments box below.

More Card Making for Beginners....
Using Focal Images
Using focal image will make your handmade cards stand out and can often convey more than words
Simple Card Making
If you are new to card making or just short of time try some simple card making ideas.
Paper Pads for Card Making
Create quick and simple handmade cards with paper pads for card making
Card Making Techniques for Beginners
Card making techniques for beginners to get you started with creating your handmade greeting cards
Card Making Sentiments
Add card making sentiments to your handmade cards to send a personalised message.
Card Making for Kids
Fun and easy card making for kids
Card Making For Beginners
Interested in card making but not sure how to start? Join me and find out more with Card Making for Beginners.
Card Making Backgrounds
Create beautiful card making backgrounds for your handmade greeting cards
Simple Card Layouts
Use these simple card layouts for making cards with minimum supplies. Great for new card makers.
Easy Card Making
Time to get started! Easy card making ideas for beginners.


FREE!
Card Making
Resources
in my

And
SIGN UP TODAY!
for more exclusive content