Sign up TODAY for Card Making News! Learn More >
Using Focal Images
Using focal images will help you create unique and eye-catching cards.
So, what's a focal image?
A focal image is the main visual element or central point of interest on your card.
It's intended to draw the viewer's attention and make it the most noticeable part of the design.
It could be ephemera, a stamped image, die cuts, a photograph or any other visual representation that conveys a message.
Do I have to Use a Focal Image?
No! The design of a card is subjective and depends on your personal artistic style. Some cards might feature text, abstract patterns, or embellishments such as ribbons or buttons. This might be sufficient.
However, using a focal image can add a nice visual touch and can assist in conveying the message or theme of your card.
It just depends on the card's purpose and the style you feel is appropriate.
Where to Place Your Focal Image?
The focal image's position on your handmade cards depends on your design style.
Most card makers follow the "Rule of Thirds".
The Rule of Thirds
The Rule of Thirds is a key composition principle. It's used in visual arts like photography, painting, and design.
To use the rule, imagine your image space divided into nine equal parts. This is done by two equally-spaced horizontal lines and two equally-spaced vertical lines.

The rule states that you should put the most important elements in your scene along these lines. Or, put them at the points where the lines meet.
An off-centre composition is more pleasing to the eye. It looks more natural than one where the subject is in the middle of the frame.
The viewer's eye is naturally drawn to these areas of intersection.
By placing your subject along the lines or where they cross, you can create more balanced, engaging, and professional results.
The most common placements are:
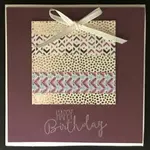
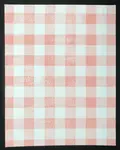
Centre - Many people place the focal image in the centre of the card front for strong, symmetrical design.
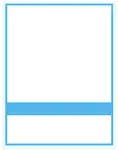
Top Third - You can also place it in the top third of the card. Then, balance it with text on the bottom two-thirds.
Place image in a corner - Either top or bottom, is another design strategy. It allows space for large text.
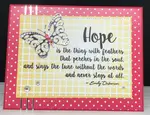
Off Centre - You can also place your focal image slightly off center. This gives a modern, asymmetrical design.
Full card - If the image is quite detailed or impactful, you could let it take up the whole front of the card.
Be creative!
Always consider which position works best for the image. It should draw the viewer's attention to the main focus of your card.
Ideas for Using Focal Images
There's so many options for picking focal images for handmade greeting cards.
Here's my suggestions:
Beautiful Blooms
Flowers are a popular choice and adored by everyone. They are versatile as they can be changed with the seasons. Or use the recipient's favourite bloom or their birth Flower.
Use a large floral focal image as the centre piece of your card surrounded by smaller flowers or leaves. Or, stamp a floral background pattern and add a larger focal image on top for contrast.
Flowers can be used for any occasion from birthday cards to sympathy cards.

Seasonal Splendor
Celebrate different times of the year with seasonal images.
During Spring add chirping birds or busy bees and colourful butterflies to your cards. Consider using pastel colours and patterns for a fresh and vibrant look.
For the Summer months add images of beach scenes, sunsets, ice cream cones and sunglasses. These fun and playful images can invoke feelings of relaxation during the sunny days of summer. Experiment with bright and bold colours to make your cards stand out.
Embrace the beauty of Autumn with images of pumpkins, leaves, acorns and cosy jumpers. Bring a sense of warmth and comfort during the autumn season. Use warm tones like oranges, browns and yellows to capture the essence of fall.
In winter, enjoy the magic of the holiday season. Use snowflakes, Christmas trees, reindeer, and hot cocoa.
These symbols of winter cheer bring a sense of nostalgia.
Include shimmering metallics, glitter and jewel tones to create a festive look.

Whimsical Wonders
Whimsical focal images add fun and charm to your cards.
Choose quirky, playful images for your cards. Images with cute animals, funky patterns or fun characters can add instant fun to your design.
Try different mediums such as markers or watercolours for colouring. Heat emboss your images or add dimension with foam adhesive. These techniques will enhance the whimsical charm of your focal images.
Whimsical images can also tell a story or convey a specific theme or mood. For example, a unicorn image from a stamp or die cut will create a message of magic and wonder.
Think about your recipient and what will bring a smile to their face. Add images theat reflect their sense of humour or special interests.

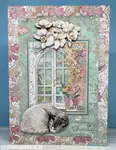
Mix, Match and Layer
Mix and match your stamp sets, dies and ephemera to suit your own card design. There's no rule that says a card has to made with elements from the same company or set.
When it comes to laying focal images the possibilities are endless.
Start by selecting a few key elements you want to feature on your card. This could be anything from floral motifs to cute animals to abstract shapes – the choice is yours!
Once you have your focal images, think about how to combine them.
Start by placing your largest image on your card front, and build up from there.
Add small images on top. Use foam adhesive or other 3D elements to create a sense of depth.
Don't be afraid to be creative with your layering. Try staggering images at different heights. Overlap them in unexpected ways. Or cut out parts of one image to reveal another underneath.
Play around with different arrangements until you find one that feels just right.
When you've finished your design take a photo with your phone to help you remember where to place each element.
Alternatively, cover your design with Press N Seal to hold the design together while you glue the back.

More Ideas for Focal Images
- Animals - A favourite pet, or a cute bird. Animals are great focal points.
- Cartoon Characters - For kids' cards, dressing your card with their favourite cartoon or storybook character can be a hit.
- Monograms or Letters - Especially for personalised cards. Initial letters can be the main attraction.
- Hearts or symbols of love - For anniversary or Valentine’s day cards.
- Birthday Images - Elements like balloons, cakes, party hats for birthday cards.
- Religious Symbols or Images - For cards meant for specific religious holidays.
- Photographs - A personal photo can be a wonderful focal point on a card.
Remember to keep the card recipient in mind. Their personality, preferences, and the occasion should guide your choice of image for the card.

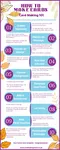
Steps for Using Focal Images
Here's some steps you can follow when using focal images....
- Choose Your Theme - The occasion or scope of the card will guide the theme. Is the card for a birthday? Holiday? A simple thank you or greeting? This will help you pick an appropriate image.
- Sketch Your Layout - Lightly sketch your layout with pencil on a piece of paper.
- Choose Your Medium - Such as coloured pencils, watercolour or alcohol markers. Collaging materials or fabric are other alternatives.
- Add Your Image - Place your image to your card front. Ask yourself whether any other elements are required.
- Add Details and Depth - Add any shading or other techniques to make your image stand out. For ephemera or die cut images this might be going around the image with a black felt tip to hide the white on the edge of the paper.
- Final Touches - Add any finishing touches. These may be embellishments or extra decorative elements.
And Finally....
Remember, a handmade greeting card can be as simple or as elaborate as you want it to be. A focal image can enhance your cards but it isn't essential.
Take your time and enjoy the process. Don't worry too much about perfection.
The handmade, personal touch is what makes these cards special!
More Card Making for Beginners
Card Making For Beginners
Interested in card making but not sure how to start? Join me and find out more with Card Making for Beginners.
Card Making Techniques for Beginners
Card making techniques for beginners to get you started with creating your handmade greeting cards
Easy Card Making
Time to get started! Easy card making ideas for beginners.
Card Sizes and Layers
Confused about card sizes and layers? Have a look at our short guide.....
Paper Pads for Card Making
Create quick and simple handmade cards with paper pads for card making
How to make cards
How to Make a Cards - a Step by Step guide for new card makers.
Card Making Backgrounds
Create beautiful card making backgrounds for your handmade greeting cards
Simple Card Making
If you are new to card making or just short of time try some simple card making ideas.
Simple Card Layouts
Use these simple card layouts for making cards with minimum supplies. Great for new card makers.
Matting and Layering for Card Making
What's matting and layering in card making? And how do you use them? Find out more....
Card Making Sentiments
Add card making sentiments to your handmade cards to send a personalised message.
Card Making for Kids
Fun and easy card making for kids


FREE!
Card Making
Resources
in my

And
SIGN UP TODAY!
for more exclusive content