Sign up TODAY for Card Making News! Learn More >
- Home
- Card Making Techniques
- Retiform Technique
Retiform Technique
The Retiform Technique is a deceptively simple design.
It allows you to create intricate and captivating designs. You divide your space into a grid and fill each section with different patterns, shapes, or colours.
Retiform comes from the Latin word "retis," meaning net. It involves creating a network or grid-like pattern on your card using lines or shapes.
For this reason it is also called the grid technique.

The technique is incredibly adaptable.
It can be used with a variety of materials, such as pencils, pens, markers, watercolours and stamps.
To get started, you'll need a few basic supplies....
- White or cream card stock. Opt for watercolour paper if using watercolours.
- Post-it notes or scraps of paper.
- Sponges or blending brushes.
- Ink pads/coloured pencils/watercolour paint/watercolour pencils.
- Image or sentiment stamps. Look for stamps with different shapes, sizes, and details. Flowers, animals, and abstract designs are popular choices.
Once you have your supplies ready, you can begin the retiform process. Start by deciding on the shape or pattern you want to create.
It could be a simple grid or intersecting lines. Or it could also be more intricate shapes, like triangles or diamonds.
Experiment a first on scrap paper - trying out different combinations of stamps and colours.
When you have made your choices use your ruler or stencil to draw the lines or shapes onto your card front.
Then add different colours, patterns, stamps to each shape.
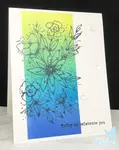
Retiform Technique - Step by Step....
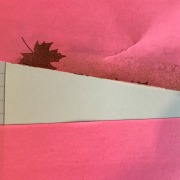
1. Use post-it note to mask off section

2. Colour card stock with inked blender brush or sponge.

3. Stamp with inked image or sentiment.
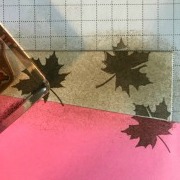
4. Cover top section with mask.
Use another post-it note to create a new section adjusting the angle of the line.
Follow steps 2, 3 and 4 until the card is completed.
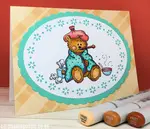
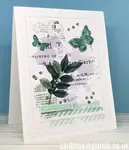
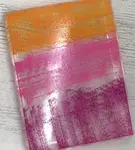
Warm autumnal colours were used to complete the card.

Ink and stamps all from Stampin Up!
Crumb Cake
Crushed Curry
Cajun Craze
Images and sentiment stamped in Early Espresso
Stamps from the following stamp sets:
"Lovely As a Tree"
"Colourful Seasons"
Try something different.....
Vary your cards by using different colour combinations...
- Complementary colours that are opposites of each other such as red and green
- Harmonious colours that are adjacent to each other on a colour wheel for example red and orange
- Colours within the same tonal range or colour family.
Other variations include:
- A mixture of image and sentiment stamps in different sections.
- A single colour but different images in each section.
- Stamping an image in the centre of the card stock and using the technique around the edges.
- Creating white space between each section by lowering the post-it mask.
- Use watercolours and apply different washes of colours to each section to create and ombre effect.
- Give your retiform cards a touch of shimmer and shine. Heat emboss your images to give a textured look to your stamped images.
- Add highlights to your stamped images with coloured pencils, watercolour pencils or markers.

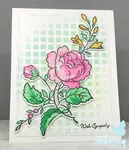
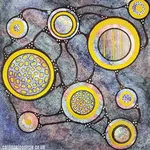
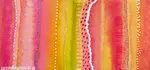
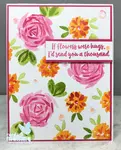
Ink and stamps as above with addition of acorns from the Painted Harvest stamp set (Stampin Up!)
Ink colours:
Emerald Envy
Lemon Lime Twist
Tempting Turquoise
Calypso Coral
Stamps from:
Jar of Love
Colourful Seasons
Discover More Card Making Techniques....
Colouring for Card Making
Use colouring for card making on your handmade greeting cards.
Stencilling Techniques for Card Making
Create beautiful card backgrounds with stencilling techniques for card making.
Rub-Ons for Card Making
Save time by using rub-ons for card making for your handmade greeting cards.
Neurographic Art
Use neurographic art to create original handmade cards. It's so relaxing!
Napkin Cards
Save money by making cheap napkin cards from your left over paper napkins.
Card Making Techniques
Discover how to use different card making techniques to make your cards sparkle
Block Printing for Card Making
Have a go at block printing with your acrylic blocks to create easy watercolour backgrounds
Artist Trading Cards
Create Artist Trading Cards with your card making supplies to collect, trade or use on greeting cards.
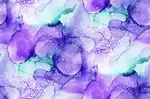
Alcohol Ink Backgrounds
Add colour and texture to your cards with alcohol ink backgrounds.
Abstract Art Cards
Create Abstract Art Cards that can be used for any occasion.
Digital Card Making
What is Digital Card Making and how can you use them in your card making?
Masking Techniques for Card Making
Learn masking techniques to create the illusion that one image in behind the other.
Layered Stamps for Card Making
Create cards with layered stamps for a beautiful 3D effect.

- Home
- Card Making Techniques
- Retiform Technique


FREE!
Card Making
Resources
in my

And
SIGN UP TODAY!
for more exclusive content