Sign up TODAY for Card Making News! Learn More >
- Home
- Card Making Techniques
- Emboss Resist
Emboss Resist
Do you remember making secret spy messages when you were young?
Writing your message in white crayon or a candle to make it invisible. Only to magically appear when covered in paint.
Emboss resist works in a similar way.
How to Emboss Resist?
This technique can be used with a variety of inks.
My preference is for Distress Inks or Distress Oxide inks as they are easier to blend.
1. Heat emboss your image onto card.
2. When cool ink blend over the image. The embossed image resists the ink.
3. Wipe excess ink off your image before completing your card.
Experiment with different coloured embossing powders, inks and card.
Let's look at some examples.....
Before starting your cards check out your card sizes and layers.
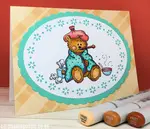
Happy Birthday - Stampin Up

This card uses the retired "Nailed It" stamp set from Stampin Up!
Retired Stampin Up! products can often be found on Ebay
Heat emboss the images with platinum embossing powder.
When cool ink blend three Ranger Distress inks (peacock feathers, mermaid lagoon and blueprint sketch) over the images. Sprinkle water over the ink to give a mottled effect.
To add a bit of definition to the tools I used a grey alcohol marker for some highlights.
Trim and add to a card layer and mount on to another card layer stencilled with the Classy Stripes Stencil from Altenew.
Finally mount onto a card front and complete with a sentiment.
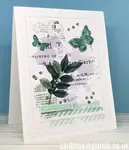
Happy Birthday - Altenew

The Hello Sunshine stamp set from Altenew is one of my favourites.
To plan the layout of the stamps I used a stamping platform (Mini Misti) before stamping and heat embossing with white embossing powder.
When cool I ink blended four Ranger Distress inks (scattered straw, shabby shutters, worn lipstick and stormy sky) over the top of the embossed images.
Wipe any excess away with a clean cloth. Cut to size and mount onto a black card layer.
Finally, add to a card base.

For the sentiment I die cut a large "Happy" three times from the Script Words 2 die set from Altenew. These were glued together for added dimension.
Complete with a smaller "Birthday" heat embossed in black on contrasting card and small drops of black Nuvo crystal drops as embellishments.
More Emboss Resist Ideas...
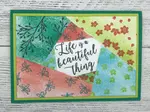
Interesting emboss resist effects can be achieved by using different inks or paint mediums.

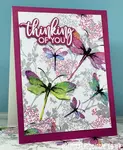
In this example the image was stamped and heat embossed onto watercolour paper.
Instead of blending the ink I used the ink smooshing technique.
This is a fun and creative way to produce a background as you can never recreate exactly the same look twice!
To ink smoosh:
- Use water reactive inks such as Ranger distress or distress oxide inks
- Smoosh or swipe your ink pad over a non stick surface such as a craft mat or piece of acetate.
- Spray water onto the ink and allow to blend.
- Lay your paper (watercolour paper recommended) over the ink and move it around to pick up the colour.
- Dry with a heat tool.
- Add more colour if required.

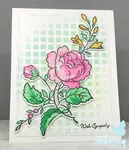
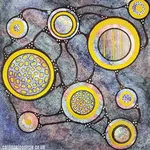
The final card uses Brusho to create an unique background to the embossed image.
Brusho are dry watercolour powders made by Colourcraft.
The colours are packaged in small white pots. Don't be deceived by the size - a little goes a long way!
Instead of opening the pot use a plastic headed push pin to pierce the lid as you only need to to sprinkle a tiny amount of powder. When not in use leave the pin in the hole.
To use Brusho:
- Sprinkle Brusho onto dry watercolour paper.
- Spritz with water to activate the colour and the magic begins!
- Adding more water creates a blended look.
- To lift the water and colour gently dab with kitchen roll.
- Allow to air dry or dry with a heat tool
- Repeat for more intense colour.
Alternatively, you can spray water onto your paper then sprinkle the Brusho. Both options produce amazing results.
Sidebar: I painted Liquid Pixie Dust over the flower area to add sparkle instead I made it translucent!
Discover More Card Making Techniques....
Colouring for Card Making
Use colouring for card making on your handmade greeting cards.
Stencilling Techniques for Card Making
Create beautiful card backgrounds with stencilling techniques for card making.
Rub-Ons for Card Making
Save time by using rub-ons for card making for your handmade greeting cards.
Retiform technique
Learn how to do the Retiform Technique with step by step instructions.
Neurographic Art
Use neurographic art to create original handmade cards. It's so relaxing!
Napkin Cards
Save money by making cheap napkin cards from your left over paper napkins.
- Home
- Card Making Techniques
- Emboss Resist


FREE!
Card Making
Resources
in my

And
SIGN UP TODAY!
for more exclusive content