Sign up TODAY for Card Making News! Learn More >
- Home
- Card Making Techniques
- Alcohol Ink Backgrounds
Alcohol Ink Backgrounds
for Beginners

If you enjoy experimenting with different techniques have a go at creating a batch of alcohol ink backgrounds.
Play around with the inks to create unique backgrounds for your cards.
So, what extra supplies will you need?
- Alcohol inks - these are sold in small bottles but don't be alarmed - a little goes a long way! I suggest initially purchasing a Ranger pack of three as they are sold in one colour family that blend together.. As you gain more experience you may like to add more colours to experiment.
- Yupo paper is recommended but as this is expensive so you might like to try some alternatives such as vellum or photo paper.
- Alcohol ink blending solution and/or Isopropyl (rubbing alcohol).
- A blowing tool such as the Tim Holtz alcohol ink blower.
Before you start creating make sure you have good ventilation as the smell from the blending solution and/or Isopropyl can be overpowering.
As I'm an asthmatic I only create alcohol ink backgrounds for a short period of time.

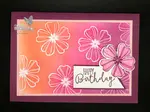
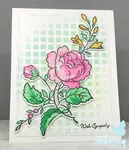
The card was completed with a flower heat embossed on vellum and a simple sentiment.
Getting started...
Every creation will be unique, so just enjoy the process and see what beautiful designs you can create.
- Cut your card to size and lay on either a wipe free surface such as a glass mat or my preferred method is to lay the card on a double sheet of kitchen towel on top of a glass mat. (belt and braces as alcohol ink can stain!). Some people like to wear disposable gloves.
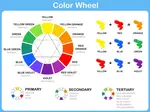
- Choose your colours - Just two to start until you gain more confidence. Too many creates a hot mess. Look at a colour wheel and choose colours next to each other on the colour wheel.
- Add some droplets of alcohol ink to your card.
- Add a small drop blending solution to the ink droplets.
- Use the blower to move the ink around. Vary the direction of the blower to move the ink along the card
- You can also reverse the process by adding the blending solution to the card and adding the alcohol ink on top.
- Add your second colour of alcohol ink and repeat.
- The ink will dry quickly. To reactivate add some more blending solution.

Other Ideas for Alcohol Ink Backgrounds
Once you have become confident in using alcohol inks start experimenting to create different effects and textures.
- Add a little Isopropyl. My Isopropyl is in a spray bottle and this creates a dabbled texture that makes the background more interesting.
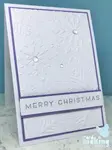
- Emboss your alcohol ink background with an embossing folder for even greater texture.
- Heat emboss an image over your background.
- Use sharpies or other alcohol ink markers instead of alcohol ink.

- Stamp an image with alcohol lift ink to create a shadow like image on your background.
- Create small texture dots on your background with an embossing tool with a rounded or ball like end.
- Use a Ranger alcohol ink applicator tool with removable felts to move the alcohol ink around and to mix the colours. Dab with the tool for interesting effects.
- Add a small amount of Ranger alcohol mixative for highlights and a metallic effect.
- Use a paint brush to "paint" with your inks and move the ink along the paper.

Don't Forget the Scraps....
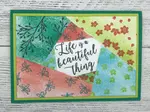
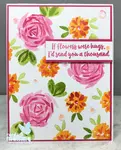
Save your alcohol ink scraps to make new cards or embellishments.
Here are a few examples....


More Card Making Techniques....
Card Making Techniques
Discover how to use different card making techniques to make your cards sparkle
Retiform technique
Learn how to do the Retiform Technique with step by step instructions.
Embossing Techniques
Create awesome effects with different embossing techniques to take your cards to the next level
Embossing Techniques Step Two
Heat embossing techniques to make your cards stand out from the crowd
Ink Blending for Card Making
Create a gradient effect on your card backgrounds by Ink blending your stamp colours together.
Stencilling Techniques for Card Making
Create beautiful card backgrounds with stencilling techniques for card making.
Layered Stamps for Card Making
Create cards with layered stamps for a beautiful 3D effect.
- Home
- Card Making Techniques
- Alcohol Ink Backgrounds


FREE!
Card Making
Resources
in my

And
SIGN UP TODAY!
for more exclusive content