Sign up TODAY for Card Making News! Learn More >
- Home
- Card Making Techniques
- Stencilling Techniques
Stencilling Techniques
for Card Making
Expand your card making repertoire by adding stencilling techniques to your handmade cards.
Stencils are thin plastic sheets with patterns, images or letter cutouts.
They are a great way to create card backgrounds and to add texture and colour. Even better they are reasonably priced and widely available.
There are so many designs to choose from!
Floral....geometric....retro.....to clouds and rain drops!
Let's look at some ways you can use them.....
Ink Blending
Your first step is to prepare your card and stencil.
- Place your stencil over the top of the card
- Turn over and fix the edges of the stencil with low tack tape to the back of the card. This will stop the stencil sliding off the card.
- Turn both over and fix the outside of your stencil to your craft mat - again to avoid slippage.
Use a blender tool, blender brush, sponge or dauber to lightly blend the ink over the stencil.
Remove your stencil to see the finished pattern or image on the card.
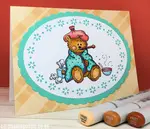
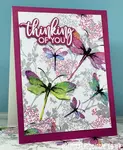
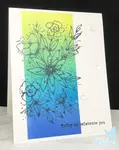
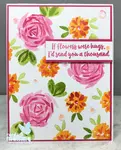
Here I used the Altenew grid stencil with analogous ink colours to create an block ombre effect for the card background.
The flower image was stamped in black ink and layering stamps used to colour the flower.
The flower was die cut and mounted with foam pads to complete the card.

Embossing Paste
Embossing paste is an excellent way to add texture to your cards.
It is a thick paste that can be applied evenly over your card and stencil with a palette knife. When dried it you are left with the raised pattern of the stencil.
After applying the paste remove the stencil straight away from the card as it dry quickly. Clean immediately with water.

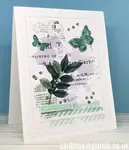
The butterfly card was made with a brick effect stencil and shimmery white embossing paste from Stampin Up!
Embossing paste is available in a variety of beautiful colours and finishes...opaque, translucent, glittery, crackle and metallic.

Mix your own custom colours with coloured ink and embossing paste.
The mandala was made with a mandala stencil and shimmery white embossing paste mixed with cracked pistachio distress oxide ink.
The card was completed with a die cut Hello from Altenew.
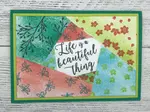
Double Stencilling Technique

This fun technique uses two stencils together. I first ink blended the mega rose stencil from Altenew with wild honey distress oxide ink and allowed this to dry.
Using my Wendy Vecchi Make Art STAY-tion I lined up the mega rose back over the blending and added the mini tiny circles stencil from the Crafters Workshop over the top.
Once these were secure I ink blended over both stencils with carved pumpkin distress oxide ink.
This is a really cool technique but to step it up a bit more I used the spotlight technique to add a bit more dimension with the carved pumpkin distress oxide ink.
The spotlight technique highlights a portion of an image in a different colour from the main image.
After ink blending the second image I die cut a circle and added it to the main image popped up with foam.
To complete the card I added a die cut "Hello" from Altenew (cut 3 times) and mounted it on a metallic copper layer before adhering to a card base.

Other Stencilling Techniques
- Heat emboss your stencil image by using Versamark ink and embossing powder.
- Dry emboss your stencil in a die cutting machine and embossing mat to create a letterpress effect.
- Create a Bokeh effect background. Blend different colours onto a card background. Use a circle stencil to sponge white craft ink over and through the stencil to blur the colours.
- Create a shadow effect by first ink blending with your stencil and then stencilling again on top in a different colour and the stencil off set from the original image.
- Have fun with a Gelli pad, stencils and acrylic paints for unique and completely different backgrounds.
- Create your own stencils with die cuts and punches eg: circles, stars
Discover More Card Making Techniques....
Colouring for Card Making
Use colouring for card making on your handmade greeting cards.
Rub-Ons for Card Making
Save time by using rub-ons for card making for your handmade greeting cards.
Retiform technique
Learn how to do the Retiform Technique with step by step instructions.
Neurographic Art
Use neurographic art to create original handmade cards. It's so relaxing!
Napkin Cards
Save money by making cheap napkin cards from your left over paper napkins.
Card Making Techniques
Discover how to use different card making techniques to make your cards sparkle
Block Printing for Card Making
Have a go at block printing with your acrylic blocks to create easy watercolour backgrounds
Artist Trading Cards
Create Artist Trading Cards with your card making supplies to collect, trade or use on greeting cards.
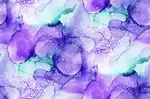
Alcohol Ink Backgrounds
Add colour and texture to your cards with alcohol ink backgrounds.
Abstract Art Cards
Create Abstract Art Cards that can be used for any occasion.
Digital Card Making
What is Digital Card Making and how can you use them in your card making?
Masking Techniques for Card Making
Learn masking techniques to create the illusion that one image in behind the other.
Layered Stamps for Card Making
Create cards with layered stamps for a beautiful 3D effect.
- Home
- Card Making Techniques
- Stencilling Techniques


FREE!
Card Making
Resources
in my

And
SIGN UP TODAY!
for more exclusive content